Installing electrical outlets can either be a straightforward task or a risky endeavor. You want to guarantee safety while enhancing your home’s functionality. By following essential tips specific to Mansfield, TX, you can navigate this process with confidence. From understanding local codes to choosing the right materials, each step matters. So, what are the key considerations that can make or break your installation project?
Understand Local Electrical Codes
When you’re planning to install electrical outlets, it’s crucial to understand local electrical codes, as they guarantee safety and compliance. These codes dictate where and how outlets can be installed, confirming they function properly while minimizing risks.
Before you start, check with your local building department for specific regulations in your area. Familiarize yourself with requirements regarding outlet placement, spacing, and the types of circuits needed.
For example, kitchens and bathrooms often require ground-fault circuit interrupter (GFCI) outlets for added safety. Additionally, it is important to be aware of the signs of electrical issues, such as frequent circuit breaker tripping, which may indicate the need for professional evaluation.
Don’t overlook the importance of permits; some installations might require them to confirm everything meets safety standards.
Choose the Right Outlet Type
When it comes to electrical outlets, choosing the right type is essential for safety and functionality.
You’ll need to take into account both voltage and amperage ratings to guarantee your devices operate efficiently. Additionally, working with professional services ensures compliance with electrical codes and enhances the safety of your home’s electrical system. Let’s explore the various outlet types available and how they fit your specific needs.
Types of Outlets
Choosing the right type of electrical outlet is vital for both safety and functionality in your home. There are several types of outlets to take into account.
Standard 120-volt outlets are common for everyday appliances and devices. If you’re using high-powered equipment, you might need a 240-volt outlet.
GFCI outlets are essential for areas prone to moisture, like bathrooms and kitchens, as they help prevent electrical shocks.
If you have devices with specific power needs, such as a home theater system, think about dedicated circuits.
Additionally, USB outlets are convenient for charging devices without adapters.
Voltage and Amperage Ratings
Understanding voltage and amperage ratings is essential for selecting the right outlet type for your home. Different appliances require specific ratings, and using the wrong outlet can lead to safety hazards.
Here are some key points to keep in mind:
- Voltage: Most homes use 120V outlets; high-power appliances may need 240V.
- Amperage: Standard outlets are typically rated for 15-20 amps; check your device requirements.
- GFCI Outlets: Required in wet areas, these protect against electrical shock.
- Dedicated Circuits: High-demand devices like refrigerators should have their own circuit.
- Surge Protectors: Consider using outlets with built-in surge protection for sensitive electronics.
Gather Necessary Tools and Materials
Before you start installing your outlet, you’ll need to gather some essential tools and materials. Make certain you have everything on your checklist, including safety gear to protect yourself during the process. Being prepared will help guarantee a smooth and efficient installation. Additionally, ensure you have GFCIs for safety to protect against electric shocks and short circuits, especially if you’re installing outlets in high-risk areas like bathrooms and kitchens.
Essential Tools Checklist
Having the right tools at your fingertips is essential for a successful electrical outlet installation. Gathering these tools guarantees you can work efficiently and safely.
Here’s a checklist to help you get started:
- Screwdriver set: Both flathead and Phillips for various screws.
- Wire stripper: For safely removing insulation from electrical wires.
- Voltage tester: To check for live wires and guarantee safety.
- Drill: Essential for creating holes for mounting the outlet.
- Fish tape: Helpful for guiding wires through walls.
With these tools in hand, you’ll be well-prepared to tackle your electrical outlet installation.
Always prioritize safety, and don’t hesitate to consult a professional if you need assistance.
Required Electrical Materials
To guarantee a smooth electrical outlet installation, gathering the right materials is essential.
Start with the electrical box, which will house the outlet securely. You’ll also need a new electrical outlet, typically a standard duplex model, and a faceplate for a finished look.
Don’t forget about wiring; 12 or 14-gauge wire is common, depending on your circuit. You’ll also require wire nuts for safe connections and electrical tape to secure them.
Keep a voltage tester handy to confirm safety during installation. Finally, have a screwdriver and a drill ready for mounting the outlet.
Safety Gear Necessities
Safety gear is essential when installing electrical outlets to protect yourself from potential hazards.
Before you start, make certain you gather the right tools and materials. Here’s a checklist of what you’ll need:
- Safety goggles: Protect your eyes from debris and sparks.
- Insulated gloves: These help prevent electrical shocks while you work.
- Hard hat: Safeguard your head from any falling objects.
- Non-slip shoes: Keep your footing secure, especially on ladders or uneven surfaces.
- Voltage tester: Verify that the power is off before you start any work.
With the proper safety gear, you’ll minimize risks and make your installation process smoother and safer.
Always prioritize your safety to guarantee a successful project.
Turn Off Power at the Circuit Breaker
Before starting any electrical work, it’s crucial to turn off the power at the circuit breaker. This simple step protects you from electrical shock and guarantees your safety while working.
Locate your home’s circuit breaker panel and identify the switch for the specific circuit you’ll be working on. It’s a good idea to label circuits if they aren’t already, making it easier for you in the future.
Once you’ve found the right breaker, flip the switch to the “off” position. To be extra cautious, you can remove the breaker’s cover or use a lockout/tagout system to prevent accidental reactivation.
Always double-check that the power is off before proceeding with any installation. This precaution not only keeps you safe but also helps prevent damage to your electrical components. Additionally, ensuring your electrical panel is in good condition can help avoid frequent breaker trips that may arise from underlying issues.
Use a Voltage Tester
A voltage tester is an essential tool for any electrical project, providing peace of mind while ensuring your safety.
Before you start working on an outlet, you must confirm that the power is off. Using a voltage tester is simple and effective. Here’s what you need to do:
- Identify the tester type: Choose between a non-contact or contact voltage tester.
- Test the tester: Make sure your voltage tester works by testing it on a live outlet first.
- Check the outlet: Place the tester’s probes into the outlet slots to confirm there’s no voltage.
- Look for indicators: Pay attention to lights or sounds from the tester; they’ll signal if voltage is present.
- Repeat as needed: Always recheck before starting work, especially after breaks.
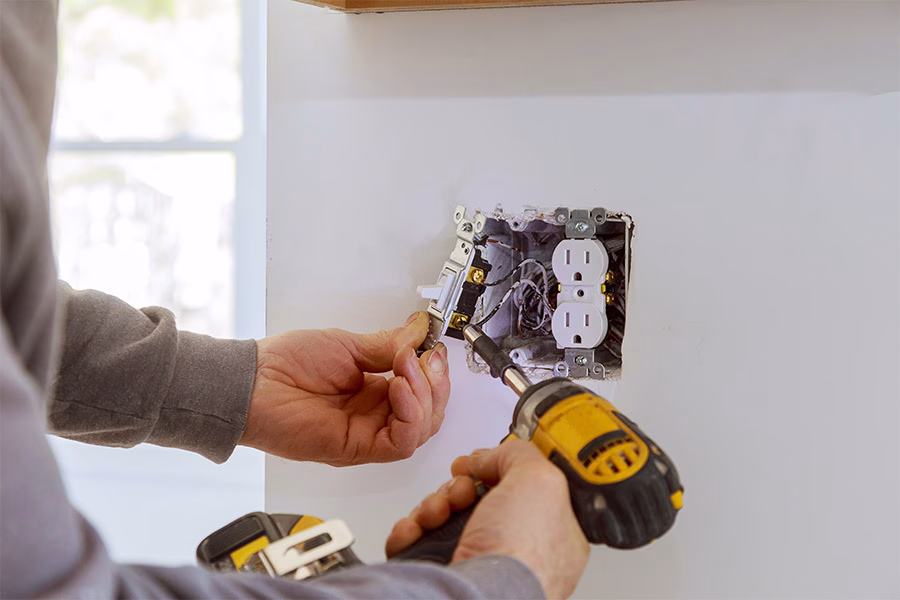
Properly Wire the Outlet
With the power confirmed off using your voltage tester, you can now focus on properly wiring the outlet.
Begin by stripping about half an inch of insulation from the ends of your wires. You’ll typically work with a black (hot), white (neutral), and bare or green (ground) wire.
Attach the black wire to the brass screw on the outlet and the white wire to the silver screw. Make certain to loop the wire around the screws in a clockwise direction for a secure connection.
Finally, connect the bare or green wire to the green ground screw. Once everything is tightly secured, double-check your connections to make sure they’re snug and correctly placed.
Keep the wires organized and avoid any contact with one another to prevent shorts. Properly wiring your outlet is essential for safety and functionality, so take your time with this step.
Secure the Outlet in the Box
Once you’ve properly wired the outlet, it’s time to secure it in the electrical box. This step is essential for guaranteeing stability and safety. Here’s how to get it right:
- Align the outlet: Position it so the screw holes line up with the box.
- Use the right screws: Grab the screws that came with the outlet, as they’re designed for a snug fit.
- Tighten carefully: Don’t overtighten; just secure it enough to hold steady without damaging the outlet.
- Check for movement: Once secured, gently wiggle the outlet to verify it’s stable and won’t come loose.
- Confirm no wires are pinched: Double-check that all wires are safely tucked inside the box and not being squeezed.
Following these steps won’t only enhance the safety of your installation but also provide a neat, professional finish to your electrical work.
Install a Cover Plate
After securing the outlet in the box, the next step is to install a cover plate. This important step not only enhances the appearance of your outlet but also provides safety by covering exposed wires and preventing accidental shocks.
Start by selecting the right cover plate that fits your outlet style and color scheme. Align the plate over the outlet, ensuring it covers all exposed components.
Use the included screws to secure the plate in place, tightening them just enough to hold the plate firmly without cracking it. Avoid over-tightening, as this can damage the cover.
Make sure the plate sits flush against the wall, creating a clean look. Finally, check that everything is secure and that no wires are visible. By finishing this step properly, you’re ensuring both safety and aesthetics in your electrical installation.
Test the Outlet After Installation
Once you’ve installed your outlet, it’s essential to test it to guarantee everything’s functioning properly.
Grab a multimeter to check the voltage and verify that the grounding connections are secure.
This step helps prevent electrical issues and keeps your home safe.
Use a Multimeter
Testing your newly installed outlet with a multimeter is essential to confirm it’s functioning correctly. This handy tool helps you check voltage, guaranteeing safety and performance.
Here’s how to use it effectively:
- Check Voltage: Confirm that the outlet is providing the correct voltage, typically 120 volts in the U.S.
- Test Polarity: Verify the hot and neutral wires are in the right positions.
- Inspect Grounding: Validate that the ground connection is secure.
- Look for Continuity: Check for any breaks in the wiring.
- Measure Amperage: Assess if the outlet can handle the load of your devices.
Check Grounding Connections
Verifying the grounding connections is an essential step in guaranteeing your outlet operates safely and effectively.
After installation, you should test the outlet to confirm proper grounding. Use a receptacle tester or a multimeter to check the connections. If you find any issues, it’s vital to correct them before using the outlet.
A properly grounded outlet protects your devices and reduces the risk of electrical shocks.
Don’t forget to inspect the wiring for any signs of wear or damage. If you’re unsure about the testing process or the connections, consider reaching out to a professional.
At Cool Hand Electric, we’re here to help guarantee your electrical installations meet all safety standards and provide peace of mind.
Schedule Regular Electrical Inspections
When you schedule regular electrical inspections, you can catch potential problems before they become costly issues. Keeping your electrical system in check not only guarantees safety but also prolongs the life of your outlets and appliances.
Here are some key benefits of regular inspections:
- Identify Hazards: Catch frayed wires or faulty outlets before they lead to fires.
- Enhance Efficiency: Discover outdated systems that waste energy and increase your bills.
- Guarantee Compliance: Stay updated with local codes and regulations to avoid penalties.
- Boost Property Value: A well-maintained electrical system can enhance your home’s market appeal.
- Peace of Mind: Knowing everything’s up to code allows you to enjoy your space without worry.
Don’t wait for a problem to arise—schedule your inspection today with Cool Hand Electric to guarantee your home’s electrical system remains safe and efficient.

Conclusion
So, you’ve mastered the art of electrical outlet installation—congrats! Just remember, safety isn’t just a suggestion; it’s the law. Ignoring local codes or skipping inspections might seem like an adventure, but let’s be real: shocking yourself isn’t the thrill you’re after. Stick to the guidelines, and you’ll have a safe, reliable electrical system. Plus, you’ll avoid becoming the star of the next “DIY Gone Wrong” video. Keep it safe, and let your outlets do their job—without drama!